ORA-39405: Oracle Data Pump does not support importing from a source database with TSTZ version …

Some time ago one of our providers sent us a datapump dump file to load in one of our databases, we proceed as usual but when it was time to do the real import this error appeared:

ORA-39405: Oracle Data Pump does not support importing from a source database with TSTZ version 34 into a target database with TSTZ version 32

Ups, what happened? After a brief googling we found the cause of the issue, the origin database uses a timezone version newer than the one used on our local database, and thus impdp avoids loading the data, ok… what does this mean?

What is the timezone version, what do the timezone files contain and why do we have to upgrade them?

The modification of dates for Daylight Saving Time (or other causes) on different countries are tracked on a public domain database backed by the ICANN. To stay up to date with the latest changes, you must upgrade the timezone information from time to time. This information allows you to assure that a certain date/hour has existed or is presumable that exists on the future.

The Oracle database stores this information on timezone files and uses them to check what dates/times are allowed (which dates and times exist on a certain year and location). These timezone files are updated from time to time due to changes decided by each country. Also note that this files are independent of database versions.

On the Oracle documentation we can find the explanation and some examples of problems issued in case of migrating data from a database with the old timezone version to one with a newer one. Basically, if you are unlucky, you can find yourself in the position where:

  • An existing time becomes a non-existing (invalid) time
  • A time becomes duplicated
  • A duplicated time becomes a non-duplicated time.

And due to previous changes it is also possible that the execution order for some database jobs change.

Ok, but we need to import the data so what can we do?

Basically we have two options:

Request the provider for the same data in the old “exp/imp” format (in case none of the contents of the data exported avoid this). It is a less friendly format, specially in case you need to do some transformations during import, but these tools don’t “care” for TSTZ versions and don’t complain. If the provider cannot resend you the data, it is possible to do it yourself, creating a temporary database with the necessary timezone to import with impdp and export with exp to obtain the dump in the old format.

The other option is to upgrade the timezone on the destination database. This implies some downtime (proportional to the number of tables with dates with timezone columns), and might cause trouble if you send information via expdp to others that haven’t made this upgrade. On the internet you can find lots of sites explaining the procedure to change the timezone, but it is also well explained on official documentation.

Regards

Problems with hibernation on Ubuntu after configure an NVIDIA graphics card

Some days ago I have tried to configure on my Ubuntu computer an old NVIDIA graphics card I had hanging around on house. My assumption is a graphics card is always better than use the embedded one…

After installation of graphic card all seems to work. The only notable difference is the size of initial text showing start of services, appearing now in a bigger font size (VGA), but when the graphic mode starts all goes fine.

Until I try to leave the machine in hibernation mode, after that the system remains on a strange status and when try to wake up it again the screen appears full of garbage… ups…

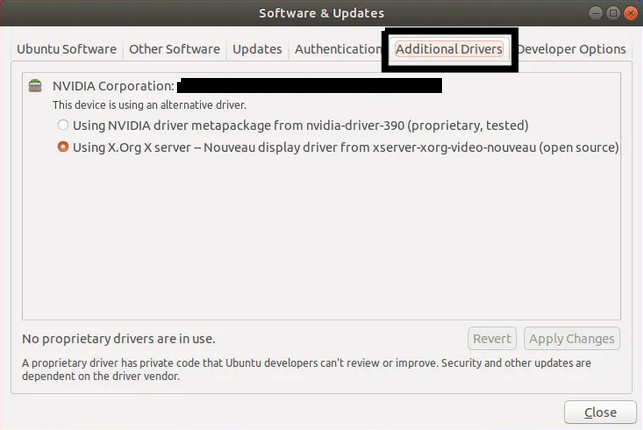
The solution to this issue was to use the proprietary driver from NVIDIA instead of the generic one, to change the driver used you must go to “Software Settings” and in “Additional drivers” switch from the generic (and open source) one, to the privative and provided by NVIDIA.

Recover lost oracle client application password

In this post I try to recover a forgotten oracle client application password, the method discussed here is not mine and I not explain as a method to “hack” oracle installations. The application must work (or at least connect to database) and requires high level of acces to the network and database.

The idea is extract the password stored on some client application with help of database side, and can be useful in case of legacy applications if the password was forgotten.

To execute this procedure you need full access (root) to the client or the server or a box in the network where server/client are located and access to SYS or SYSTEM account on database.

The method I use is the one explained on this github post https://github.com/r1-/oradecr , give the credits to the author 🙂 , I only try to explain in more detail with an example.

First we setup and user with and know password to check if the procedure works:

./sqlplus system/system_password@//192.168.56.101/orcl

SQL*Plus: Release 11.2.0.4.0 Production on Tue Jan 26 18:54:17 2021

Copyright (c) 1982, 2013, Oracle.  All rights reserved.


Connected to:
Oracle Database 11g Release 11.2.0.4.0 - 64bit Production
With the Real Application Clusters and Automatic Storage Management options

SQL> alter user test identified by system_password;

User altered.

SQL> exit
Disconnected from Oracle Database 11g Release 11.2.0.4.0 - 64bit Production
With the Real Application Clusters and Automatic Storage Management options

Now we need a linux box with python 2.7 (if you plan to use with python 3.x you must adjust the script code). This can be done installing an “Ubuntu 18.04 minimal installation” and adding this packages:

sudo apt install python-minimal
sudo apt install python-pip

user@ubuntu:~$ /usr/bin/python
Python 2.7.17 (default, Sep 30 2020, 13:38:04) 
[GCC 7.5.0] on linux2
Type "help", "copyright", "credits" or "license" for more information.
>>> 

Now we need to capture all traffic from client to database, this can be done from the client machine, from the server o from any box connected to same network with an network sniffer installed and root permissions.

We use the server to sniff the packets using the tcpdump tool. This tool can filter network packets by origin or destination IP, port, protocol and so on. In a real case we need to filter at maximum to capture the least amount of data possible (we only need the first pakets from our client).

In this example we capture all traffic to port 1521 with the complete payload of every network packet.

suse12-112-rac1:~ # tcpdump -nnvvXSs 1514 port 1521 -w /tmp/packet_dump.dat
tcpdump: listening on eth0, link-type EN10MB (Ethernet), capture size 1514 bytes
^C49 packets captured
49 packets received by filter
0 packets dropped by kernel

With tcpdump started we launch our “application” (sqlplus in our case)

sqlplus test/system_password@//192.168.56.101/orcl

SQL*Plus: Release 11.2.0.4.0 Production on Tue Jan 26 18:55:31 2021

Copyright (c) 1982, 2013, Oracle.  All rights reserved.


Connected to:
Oracle Database 11g Release 11.2.0.4.0 - 64bit Production
With the Real Application Clusters and Automatic Storage Management options

SQL> exit
Disconnected from Oracle Database 11g Release 11.2.0.4.0 - 64bit Production
With the Real Application Clusters and Automatic Storage Management options

After that we stop tcpdump, and review the captured data. We must find the client AUTH_SESSKEY (the first one), the server AUTH_SESSKEY (the second one) and the AUTH_PASSWORD on the contents of captured packets.

suse12-112-rac1:~ # tcpdump -nnvvXSs 1514 port 1521 -r /tmp/packet_dump.dat | less
reading from file /tmp/packet_dump.dat, link-type EN10MB (Ethernet)
        0x0030:  0849 dd3d 0186 0000 0600 0000 0000 0803  .I.=............
        0x0040:  000c 0000 000c 4155 5448 5f53 4553 534b  ......AUTH_SESSK
        0x0050:  4559 6000 0000 6038 4445 3035 3338 4330  EY`...`8DE0538C0
        0x0060:  4231 3134 3144 3731 3132 3839 4637 4334  B1141D711289F7C4
        0x0070:  3942 3539 3032 4230 3546 4242 4132 4146  9B5902B05FBBA2AF
        0x0080:  3431 3738 3734 3044 4346 4332 3739 4136  4178740DCFC279A6
        0x0090:  4643 4432 4338 4132 4435 3433 3842 3731  FCD2C8A2D5438B71
        0x00a0:  3242 3434 4235 3438 4343 3341 4633 3546  2B44B548CC3AF35F
        0x00b0:  3439 3831 4539 4200 0000 000d 0000 000d  4981E9B.........
        0x00c0:  4155 5448 5f56 4652 5f44 4154 4114 0000  AUTH_VFR_DATA...
        0x00d0:  0014 3234 4230 3632 3030 3346 3630 4338  ..24B062003F60C8
        0x00e0:  4630 3739 4530 251b 0000 1a00 0000 1a41  F079E0%........A
        0x00f0:  5554 485f 474c 4f42 414c 4c59 5f55 4e49  UTH_GLOBALLY_UNI
        0x0100:  5155 455f 4442 4944 0020 0000 0020 4236  QUE_DBID......B6
        0x0110:  3642 3633 4337 3444 3934 3933 3239 4144  6B63C74D949329AD
        0x0120:  3336 3731 4437 4536 3644 4238 3038 0000  3671D7E66DB808..
        0x0130:  0000 0401 0000 0002 0001 0000 0000 0000  ................
 
        0x0060:  00fe ffff ffff ffff fffe ffff ffff ffff  ................
        0x0070:  ff06 7379 7374 656d 0c00 0000 0c41 5554  ..system.....AUT
        0x0080:  485f 5345 5353 4b45 5960 0000 00fe 4038  H_SESSKEY`....@8
        0x0090:  3535 4138 3541 4533 4636 4234 3242 3333  55A85AE3F6B42B33
        0x00a0:  4531 3842 4130 3232 3743 3242 4644 4431  E18BA0227C2BFDD1
        0x00b0:  3943 3334 4432 3035 3137 3042 3945 3743  9C34D205170B9E7C
        0x00c0:  3739 3138 3241 3133 4644 4532 3130 4120  79182A13FDE210A.
        0x00d0:  3732 3338 3839 3732 4536 3241 4437 3836  72388972E62AD786
        0x00e0:  4438 3044 4330 3634 3238 3234 3030 3233  D80DC06428240023
        0x00f0:  0001 0000 000d 0000 000d 4155 5448 5f50  ..........AUTH_P
        0x0100:  4153 5357 4f52 4440 0000 0040 3332 4336  ASSWORD@...@32C6
        0x0110:  4335 3038 4546 4336 4644 4441 3838 3245  C508EFC6FDDA882E
        0x0120:  4335 4141 3437 4433 3532 3637 3631 4130  C5AA47D3526761A0
        0x0130:  3841 3443 3833 3644 3243 3243 3739 4545  8A4C836D2C2C79EE
        0x0140:  4534 4337 3544 3531 4236 4643 0000 0000  E4C75D51B6FC....
        0x0150:  0800 0000 0841 5554 485f 5254 5404 0000  .....AUTH_RTT...
        0x0160:  0004 3333 3534 0000 0000 0d00 0000 0d41  ..3354.........A
        0x0170:  5554 485f 434c 4e54 5f4d 454d 0400 0000  UTH_CLNT_MEM....
        0x0180:  0434 3039 3600 0000 000d 0000 000d 4155  .4096.........AU

After some cleaning this is the result:

AUTH_SESSKEY 8DE0538C0B1141D711289F7C49B5902B05FBBA2AF4178740DCFC279A6FCD2C8A2D5438B712B44B548CC3AF35F4981E9B

AUTH_SESSKEY 855A85AE3F6B42B33E18BA0227C2BFDD19C34D205170B9E7C79182A13FDE210A72388972E62AD786D80DC06428240023

AUTH_PASSWORD 32C6C508EFC6FDDA882EC5AA47D3526761A08A4C836D2C2C79EEE4C75D51B6FC

Finally we need the spare value from the password located on USER$ table on the database, to view this data we need to connect as SYSTEM or SYS (or any user with admin privileges).

./sqlplus system/system_password@//192.168.56.101/orcl

SQL*Plus: Release 11.2.0.4.0 Production on Tue Jan 26 19:00:38 2021

Copyright (c) 1982, 2013, Oracle.  All rights reserved.


Connected to:
Oracle Database 11g Release 11.2.0.4.0 - 64bit Production
With the Real Application Clusters and Automatic Storage Management options

SQL> select spare4 from sys.user$ where name='TEST';

SPARE4
--------------------------------------------------------------------------------
S:B1A8E327006D984A6C2F6248CB301E6AB9EE889424B062003F60C8F079E0

SQL> 

Ok, we have all necessary data, now we can execute the python script (downloaded from github) passing the data we have located

oracle@ubuntu:~$ ./oradec11.py 8DE0538C0B1141D711289F7C49B5902B05FBBA2AF4178740DCFC279A6FCD2C8A2D5438B712B44B548CC3AF35F4981E9B 855A85AE3F6B42B33E18BA0227C2BFDD19C34D205170B9E7C79182A13FDE210A72388972E62AD786D80DC06428240023 32C6C508EFC6FDDA882EC5AA47D3526761A08A4C836D2C2C79EEE4C75D51B6FC S:B1A8E327006D984A6C2F6248CB301E6AB9EE889424B062003F60C8F079E0
Password : system_password

Hope it helps.

How to downgrade Oracle ASM Diskgroup “COMPATIBLE.ASM” parameter

Don’t do it, this parameter influences multiple other configurations and to downgrade it can create a complete mess on the affected diskgroups.

This said, in one of my Oracle RAC “sandbox” I upgraded the Clusterware from 11gR2 to 19c and wanted to try the downgrade procedure. The downgrade failed due to one of the diskgroups having the COMPATIBLE.ASM advanced to 12.1.0.0.0 and this prevents their usage with 11.2.0.4 clusterware. I know it’s not possible (in a supported way) to downgrade this parameter, the compatible parameters can only go forward, but is there any way to do this? let’s try it….

First things first, all these blogs helped me to find how to change this parameter. I recommend visiting them:

https://maxfilatov.wordpress.com/2014/03/21/how-to-downgrade-compatibility-rdbms/

http://asmsupportguy.blogspot.com/2013/08/partnership-and-status-table.html

Remember this is a test, use only on non production / non relevant environments at your own risk.

The problem begins here:

SQL> select name,COMPATIBILITY from v$asm_Diskgroup

NAME COMPATIBILITY

-----------------------------------

DATA 11.2.0.4.0
GRID 12.1.0.0.0
RECUPERA 11.2.0.4.0
REDO 11.2.0.4.0

After some googling I found only information about the usage of this parameter and the way to change it upwards.

I also found a few blogs on ASM internals and cheating and with the techniques on these blogs decided to try to find it by myself.

The compatible.asm parameter must be on some part of clusterware configuration.

After taking a look at the contents of OCR (Oracle Cluster Registry) and OLR (Oracle Local Registry) I didn’t find any traces of it. This makes sense, this parameter is exclusive to every diskgroup, then maybe it is located somewhere on the diskgroup.

I also found something weird, the ASM instance changes the compatible.asm parameter “on the fly” when the diskgroups are mounted.

This is an excerpt of the alert log from ASM instance:

2021-01-04T21:15:46.818231+01:00
NOTE: Instance updated compatible.asm to 11.2.0.4.0 for grp 1 (DATA).
2021-01-04T21:15:46.819002+01:00
NOTE: Instance updated compatible.asm to 11.2.0.4.0 for grp 1 (DATA).
2021-01-04T21:15:46.820482+01:00
NOTE: Instance updated compatible.rdbms to 11.2.0.0.0 for grp 1 (DATA).
2021-01-04T21:15:46.820822+01:00
NOTE: Instance updated compatible.rdbms to 11.2.0.0.0 for grp 1 (DATA).
2021-01-04T21:15:46.825041+01:00
SUCCESS: diskgroup DATA was mounted

On the affected diskgroup appears the problematic value

2021-01-04T19:54:55.954388+01:00
NOTE: Instance updated compatible.asm to 12.1.0.0.0 for grp 2 (GRID).
2021-01-04T19:54:55.954796+01:00
NOTE: Instance updated compatible.asm to 12.1.0.0.0 for grp 2 (GRID).
2021-01-04T19:54:55.955372+01:00

NOTE: Instance updated compatible.rdbms to 11.2.0.0.0 for grp 2 (GRID).
2021-01-04T19:54:55.955576+01:00
NOTE: Instance updated compatible.rdbms to 11.2.0.0.0 for grp 2 (GRID).
2021-01-04T19:54:55.958458+01:00
SUCCESS: diskgroup GRID was mounted

It seems that asm disks have, on they first allocation units, some control structures. These structures contain data about the disk itself and their contents. Using the “kfed” tool we can read this data, and most importantly, we can change it.

This information can be present on all or only some of the disks. In my example, and due to the diskgroup used for the test having only one disk, this is not an issue.

Using the tool kfed I reviewed the information stored on the first allocation units of the disk

oracle@suse12-112-rac1:~/scripts> for i in {0..5}; do for j in {0..100}; do $ORACLE_HOME/bin/kfed read ORCL:GRID01 aun=$i blkn=$j |grep -i -C 2 compat&&echo $i $j; done; done
kfdhdb.driver.reserved[4]: 0 ; 0x018: 0x00000000
kfdhdb.driver.reserved[5]: 0 ; 0x01c: 0x00000000
kfdhdb.compat: 202375168 ; 0x020: 0x0c100000
kfdhdb.dsknum: 0 ; 0x024: 0x0000

kfdhdb.grptyp: 1 ; 0x026: KFDGTP_EXTERNAL

kfdhdb.redomirrors[2]: 65535 ; 0x0dc: 0xffff
kfdhdb.redomirrors[3]: 65535 ; 0x0de: 0xffff
kfdhdb.dbcompat: 168820736 ; 0x0e0: 0x0a100000
kfdhdb.grpstmp.hi: 33089643 ; 0x0e4: HOUR=0xb DAYS=0x3 MNTH=0xa YEAR=0x7e3
kfdhdb.grpstmp.lo: 3767868416 ; 0x0e8: USEC=0x0 MSEC=0x147 SECS=0x9 MINS=0x38
0 0
kfdpHdrPairBv1.first.super.copy[4]: 0 ; 0x020: 0x0000
kfdpHdrPairBv1.first.super.dtaSz: 1 ; 0x022: 0x0001
kfdpHdrPairBv1.first.asmCompat:202375168 ; 0x024: 0x0c100000
kfdpHdrPairBv1.first.newCopy[0]: 0 ; 0x028: 0x0000

kfdpHdrPairBv1.first.newCopy[1]: 0 ; 0x02a: 0x0000

kfdpHdrPairBv1.second.super.copy[4]: 0 ; 0x0a4: 0x0000
kfdpHdrPairBv1.second.super.dtaSz: 0 ; 0x0a6: 0x0000
kfdpHdrPairBv1.second.asmCompat: 0 ; 0x0a8: 0x00000000
kfdpHdrPairBv1.second.newCopy[0]: 0 ; 0x0ac: 0x0000
kfdpHdrPairBv1.second.newCopy[1]: 0 ; 0x0ae: 0x0000
1 0
kfdpHdrPairBv1.first.super.copy[4]: 0 ; 0x020: 0x0000
kfdpHdrPairBv1.first.super.dtaSz: 1 ; 0x022: 0x0001
kfdpHdrPairBv1.first.asmCompat:202375168 ; 0x024: 0x0c100000
kfdpHdrPairBv1.first.newCopy[0]: 0 ; 0x028: 0x0000

kfdpHdrPairBv1.first.newCopy[1]: 0 ; 0x02a: 0x0000

kfdpHdrPairBv1.second.super.copy[4]: 0 ; 0x0a4: 0x0000
kfdpHdrPairBv1.second.super.dtaSz: 0 ; 0x0a6: 0x0000
kfdpHdrPairBv1.second.asmCompat: 0 ; 0x0a8: 0x00000000
kfdpHdrPairBv1.second.newCopy[0]: 0 ; 0x0ac: 0x0000
kfdpHdrPairBv1.second.newCopy[1]: 0 ; 0x0ae: 0x0000
1 1

These line seems interesting:

kfdpHdrPairBv1.first.asmCompat:202375168 ; 0x024: 0x0c100000

After some googling and some tests I found these results:

kfdpHdrPairBv1.first.asmCompat:202375168 ; 0x024: 0x0c100000 -> Seems is 12.1.0.0.0

kfdpHdrPairBv1.first.asmCompat:186646528 ; 0x024: 0x0b200000 -> Seems is 11.2.0.0.0

I also found that, from other locations, this values also represent a “Release number”

kfdhdb.compat: 168820736 ; 0x020: 0x0a100000 -> Seems is 10.1.0.0.0

And finally after some (lots of) trial and error I found this:

kfdpHdrPairBv1.first.asmCompat:186647552 ; 0x024: 0x0b200400 -> Must be 11.2.0.4.0

To change parameters from ASM headers you must write first all the configuration from one block of the ASM header to a text file, modify said text file and finally write the block again using the text file as an input:

oracle@suse12-112-rac1:~/scripts> $ORACLE_HOME/bin/kfed read ORCL:GRID01 aun=1 blkn=0 > /tmp/grid_1_0.txt
oracle@suse12-112-rac1:~/scripts> $ORACLE_HOME/bin/kfed read ORCL:GRID01 aun=1 blkn=1 > /tmp/grid_1_1.txt
oracle@suse12-112-rac1:~/scripts> cp /tmp/grid_1_0.txt /tmp/grid_1_0.txt.original
oracle@suse12-112-rac1:~/scripts> cp /tmp/grid_1_1.txt /tmp/grid_1_1.txt.original
oracle@suse12-112-rac1:~/scripts> vi /tmp/grid_1_0.txt
oracle@suse12-112-rac1:~/scripts> vi /tmp/grid_1_1.txt
oracle@suse12-112-rac1:~/scripts> diff /tmp/grid_1_0.txt /tmp/grid_1_0.txt.original
26c26

< kfdpHdrPairBv1.first.asmCompat:186646528 ; 0x024: 0x0b200400

kfdpHdrPairBv1.first.asmCompat:202375168 ; 0x024: 0x0c100000

oracle@suse12-112-rac1:~/scripts> diff /tmp/grid_1_1.txt /tmp/grid_1_1.txt.original
26c26

< kfdpHdrPairBv1.first.asmCompat:186646528 ; 0x024: 0x0b200400

kfdpHdrPairBv1.first.asmCompat:202375168 ; 0x024: 0x0c100000

After a complete “restart” of the clusterware the “downgraded” value appears, and everything seems to work (at least at the moment; I haven’t executed tests in deep).

SQL> select name,COMPATIBILITY from v$asm_Diskgroup

NAME COMPATIBILITY


DATA 11.2.0.4.0
GRID 11.2.0.4.0
RECUPERA 11.2.0.4.0
REDO 11.2.0.4.0

2021-01-04T21:15:46.818231+01:00
NOTE: Instance updated compatible.asm to 11.2.0.4.0 for grp 1 (DATA).
2021-01-04T21:15:46.819002+01:00
NOTE: Instance updated compatible.asm to 11.2.0.4.0 for grp 1 (DATA).
2021-01-04T21:15:46.820482+01:00
NOTE: Instance updated compatible.rdbms to 11.2.0.0.0 for grp 1 (DATA).
2021-01-04T21:15:46.820822+01:00
NOTE: Instance updated compatible.rdbms to 11.2.0.0.0 for grp 1 (DATA).
2021-01-04T21:15:46.825041+01:00
SUCCESS: diskgroup DATA was mounted
2021-01-04T21:15:46.851896+01:00
NOTE: Instance updated compatible.asm to 11.2.0.4.0 for grp 2 (GRID).
2021-01-04T21:15:46.852851+01:00
NOTE: Instance updated compatible.asm to 11.2.0.4.0 for grp 2 (GRID).

2021-01-04T21:15:46.853819+01:00
NOTE: Instance updated compatible.rdbms to 11.2.0.0.0 for grp 2 (GRID).
2021-01-04T21:15:46.854163+01:00
NOTE: Instance updated compatible.rdbms to 11.2.0.0.0 for grp 2 (GRID).
2021-01-04T21:15:46.857068+01:00
SUCCESS: diskgroup GRID was mounted
2021-01-04T21:15:46.893073+01:00
NOTE: Instance updated compatible.asm to 11.2.0.4.0 for grp 3 (RECUPERA).
2021-01-04T21:15:46.894085+01:00
NOTE: Instance updated compatible.asm to 11.2.0.4.0 for grp 3 (RECUPERA).
2021-01-04T21:15:46.895135+01:00
NOTE: Instance updated compatible.rdbms to 11.2.0.0.0 for grp 3 (RECUPERA).
2021-01-04T21:15:46.895527+01:00
NOTE: Instance updated compatible.rdbms to 11.2.0.0.0 for grp 3 (RECUPERA).
2021-01-04T21:15:46.898445+01:00
SUCCESS: diskgroup RECUPERA was mounted
2021-01-04T21:15:46.927055+01:00
NOTE: Instance updated compatible.asm to 11.2.0.4.0 for grp 4 (REDO).
2021-01-04T21:15:46.927812+01:00
NOTE: Instance updated compatible.asm to 11.2.0.4.0 for grp 4 (REDO).
2021-01-04T21:15:46.928942+01:00
NOTE: Instance updated compatible.rdbms to 11.2.0.0.0 for grp 4 (REDO).
2021-01-04T21:15:46.929426+01:00
NOTE: Instance updated compatible.rdbms to 11.2.0.0.0 for grp 4 (REDO).
2021-01-04T21:15:46.932059+01:00
SUCCESS: diskgroup REDO was mounted
2021-01-04T21:15:46.959830+01:00
SUCCESS: ALTER DISKGROUP ALL MOUNT /* asm agent call crs // {0:0:2674} */
2021-01-04T21:15:47.317359+01:00

Thanks for reading!

Unable to connect remotely as sysdba on 19c

In one upgraded test box we are unable to connect remotely as sysdba, afeter some digging have found that no password file is used by database.

[oracle@suse12-112-rac2:~> sqlplus sys/oracle@192.168.56.102/cdb.localdomain as sysdba

SQL*Plus: Release 19.0.0.0.0 - Production on Sat Jan 2 16:57:18 2021
Version 19.8.0.0.0

Copyright (c) 1982, 2019, Oracle.  All rights reserved.

ERROR:
ORA-01017: invalid username/password; logon denied

After review some parameters, seems the database is configured to use passwordfile, but no users are present on passwordfile

SQL> show parameter password

NAME				     TYPE	 VALUE
------------------------------------ ----------- ------------------------------
remote_login_passwordfile	     string	 EXCLUSIVE

SQL> select * from v$pwfile_users;

no rows selected

The password file is missing, after create it and restart the database is possible to connect

oracle@suse12-112-rac2:/oracle/app/oracle/product/19.8.0/db_1/dbs> ls
hc_cdb.dat  init.ora  lkCDB
oracle@suse12-112-rac2:/oracle/app/oracle/product/19.8.0/db_1/dbs> orapwd file=orapwcdb password=oracle force=y format=12
oracle@suse12-112-rac2:/oracle/app/oracle/product/19.8.0/db_1/dbs> ls -la
total 24
drwxr-xr-x  2 oracle oinstall 4096  2 gen 17:28 .
drwxr-xr-x 72 oracle oinstall 4096 20 oct 16:46 ..
-rw-rw----  1 oracle dba      1544  2 gen 17:23 hc_cdb.dat
-rw-r--r--  1 oracle oinstall 3079 14 mai  2015 init.ora
-rw-r-----  1 oracle dba        24 20 oct 16:47 lkCDB
-rw-r-----  1 oracle oinstall 2048  2 gen 17:28 orapwcdb

Now the SYS user appears listed on the passwordfile users.

SQL> select username from v$pwfile_users;

USERNAME
--------------------------------------------------------------------------------------------------------------------------------
SYS

Note: From 18c, and to allow define the ORACLE_HOME folder as “read only” the new default location for passwordfile is ORACLE_BASE instead of ORACLE_HOME/dbs. But as noted on this example the previous location continues to work.

Monitoring and reporting tablespace usage

If you have to administer some databases, one of the most common points to revise are the space usage on tablespaces. Sometimes it is necessary to add some more space, sometimes it is necessary to check the space usage if the growth is bigger than expected.

If you have an Enterprise Edition database and have licenses for Diagnostics Pack, “out of the box” you can:

  • View the history data of the tablespace size ¹
  • Configure mail or SMS alerts on Enterprise Manager/Cloud Control ²

¹  This information is captured by default on the DBA_HIST_TALESPACE_STAT table. Note that all dictionary views beginning with the prefix DBA_HIST_ are part of the Diagnostic Pack (with some exceptions) and cannot be used without license.

² To send Mail, SMS, traps or any other notification from Enterprise Manager / Cloud Control (for example an alert for full or near full tablespaces) it is necessary to have Diagnostic Pack licensed.

In case of not have “Enterprise Edition” and “Diagnostic Pack” it is necessary to gather and store the usage data and send alerts  “by hand”.

In my case we use different approaches:

  • A custom PL/SQL task to store usage information on database tables (to generate growing reports).
  • One trigger on Zabbix to alert in case of usage issues (normally in late night hours 😉 )
  • And finally one script to generate and send by mail a report every morning (to review abnormal growing and add space before space usage triggers ask to do so).

The last one is programmed on the Linux database server crontab, the cron scheduler calls a very simple scrip like this:


. /home/oracle/scripts/setenv_nobd.env
export ORACLE_SID=MYBBDD
sqlplus -s -m "HTML ON" \'/ as sysdba\' @/home/oracle/scripts/report_tablespaces.sql > /home/oracle/scripts/tablespace_MYBBDD.html
mutt mymail@company.com othersmail@company.com -s "Tablespaces MYBBDD" < /home/oracle/scripts/tablespace_MYBBDD.html


And the “report_tablespaces.sql” executed contains this SQL sentence:

select
a.tablespace_name,
SUM(a.bytes)/1024/1024 "Curent_Mb",
SUM(decode(b.maxextend, null, A.BYTES/1024/1024, b.maxextend*8192/1024/1024)) "Max_Possible_Mb",
(SUM(a.bytes)/1024/1024 - round(c."Free"/1024/1024)) "Total_MB_Used",
(greatest(SUM(decode(b.maxextend, null, A.BYTES/1024/1024, b.maxextend*8192/1024/1024)),SUM(a.bytes)/1024/1024 ) - (SUM(a.bytes)/1024/1024 - round(c."Free"/1024/1024))) "Total_MB_Free",
round(100*(SUM(a.bytes)/1024/1024 - round(c."Free"/1024/1024))/(  greatest(SUM(decode(b.maxextend, null, A.BYTES/1024/1024, b.maxextend*8192/1024/1024)),SUM(a.bytes)/1024/1024 )  )) "Used_Percent"
from
  dba_data_files a,
  sys.filext$ b,
  (SELECT d.tablespace_name , sum(nvl(c.bytes,0)) "Free"
FROM dba_tablespaces d,DBA_FREE_SPACE c
where d.tablespace_name = c.tablespace_name(+)
group by d.tablespace_name) c
where a.file_id = b.file#(+)
and a.tablespace_name = c.tablespace_name
group by a.tablespace_name, c."Free"/1024
order by 6 desc;

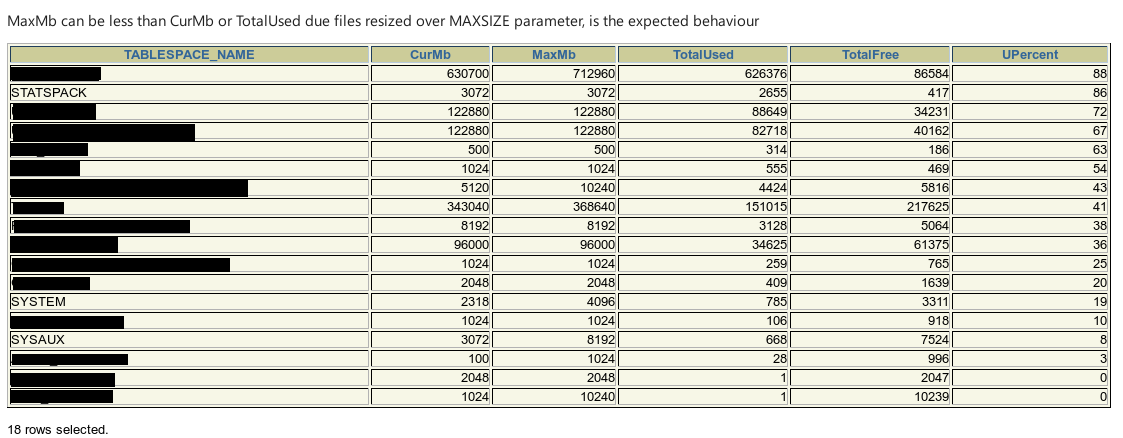
The differences between this select and most of the ones found on the internet are that these take into account the “MAXSIZE” of the datafiles to avoid:

  • False issues in the case where the tablespace can grow automatically,  taking into account the “maximum theoretical size” of the files. For example, in case of a file in x86_64 Linux platform without “MAXSIZE” defined and autoextend “ON” the maximum size is 32Gb (if the underlying storage has space to allow growth until this size).
  • Bizarre results (like negative occupation) if the “MAXSIZE” of files is less than the actual file size. ³


³ You can create a tablespace with one or more datafiles with “MAXSIZE” defined, and after that “ALTER” the datafiles to a bigger size than “MAXSIZE” (Oracle will not show an error nor remove MAXSIZE from datafile definition on dictionary tables).

The result is a “simple” but effective html tablespace usage report

TablespaceUsage


Linux cron tasks not executed

Some days ago have found an issue trying to execute some tasks via “cron” on my linux box, seems that cron ignores my tasks….

To execute tasks on cron you can:

  • Edit the “crontab” file for the current user (with command “crontab -e“), and put on them some tasks.

Every user allowed to execute cron tasks (take a look at /etc/cron.allow and /etc/cron.deny ) have its own crontab file with their tasks (and these tasks can be reviewed with the command “crontab -l“).

  • Also if you have root permissions you can leave the script on some of the “cron” directories under /etc:

/etc/cron.houry

/etc/cron.daily

/etc/cron.weekly

/etc/cron.monthly

The scripts located under these directories must be executed on the defined basis (every hour, day, week or month).


Ok, so fine, so good. I’m little lazzy, this second method seems faster and my scrip fits on one of these execution windows (is a daily script)… then I move the script to the folder /etc/cron.daily.

Some days after the scrip have no executions ¿?

After some digging have found the reason of the “no execution”… the main cron process responsible of execute the scripts inside of these folders (called “run-parts”) not like some characters on scripts names, and these “not liked” characters include “dots”, then all my scripts (ending with .sh due are shell scripts) are ignored.

After remove the extension of the scripts all began to execute on the expected time frames.

Also found that is possible to execute a “dry-run” of the “run-parts” process to check if you script is one of the candidates to be executed.


root@VirtualBox:~# run-parts --test /etc/cron.daily
/etc/cron.daily/0anacron
/etc/cron.daily/apache2
/etc/cron.daily/apport
/etc/cron.daily/apt-compat
/etc/cron.daily/bsdmainutils
/etc/cron.daily/cracklib-runtime
/etc/cron.daily/dpkg
/etc/cron.daily/google-chrome
/etc/cron.daily/logrotate
/etc/cron.daily/man-db
/etc/cron.daily/mlocate
/etc/cron.daily/ntp
/etc/cron.daily/passwd
/etc/cron.daily/popularity-contest
/etc/cron.daily/update-notifier-common
/etc/cron.daily/upstart
root@VirtualBox:~# echo "echo HOLA" > /etc/cron.hourly/say_hola.sh
root@VirtualBox:~# chmod 755 /etc/cron.hourly/say_hola.sh
root@VirtualBox:~# run-parts --test /etc/cron.hourly
root@VirtualBox:~# mv /etc/cron.hourly/say_hola.sh /etc/cron.hourly/say_hola
root@VirtualBox:~# run-parts --test /etc/cron.hourly
/etc/cron.hourly/say_hola

No such file or directory

Some time ago,  after installing and old java release on an Ubuntu machine we found this strange error wen I tried to execute it:

root@ubuntu:~# ls -la /usr/lib/jvm/java-6-openjdk-/i386/jre/bin/java
-rwxr-xr-x 1 root root 38576 Aug 26  2016 /usr/lib/jvm/java-6-openjdk-/i386/jre/bin/java
root@ubuntu:~# /usr/lib/jvm/java-6-openjdk-/i386/jre/bin/java -version
-bash: /usr/lib/jvm/java-6-openjdk-/i386/jre/bin/java: No such file or directory


The file had execute permissions, was not corrupted, and the route to the file was correct… but it appears a message like if the file doesn’t exists ¿?

After some debugging we found the clue, the error was due the lack of 32bit architecture support on the operating system (the Ubuntu have only the 64bit support enabled).

 
oot@ubuntu:~# file /usr/lib/jvm/java-6-openjdk-i386/jre/bin/java
/usr/lib/jvm/java-6-openjdk-i386/jre/bin/java: ELF 32-bit LSB executable, Intel 80386, version 1 (SYSV), dynamically linked, interpreter /lib/ld-linux.so.2, for GNU/Linux 2.6.24, BuildID[sha1]=90c78793edbc73af380f303d0754ae681117f9f8, stripped
root@ubuntu:~# uname -a
Linux ubuntu 4.4.0-81-generic #104-Ubuntu SMP Wed Jun 14 08:17:06 UTC 2017 x86_64 x86_64 x86_64 GNU/Linux

The java executable is a 32bit one dynamically linked so it needs some 32bit libraries from the operating system.

To solve the issue, connected as root, we must enable the 32bit architecture:

 
dpkg --add-architecture i386

And install all the necessary 32bit libraries:

 
apt-get update
apt-get install libc6:i386 libstdc++6:i386 zlib1g:i386

And after that the 32bit java executes fine….

 
root@ubuntu:~# /usr/lib/jvm/java-6-openjdk-i386/jre/bin/java -version
java version "1.6.0_40"
OpenJDK Runtime Environment (IcedTea6 1.13.12) (6b40-1.13.12-0ubuntu0.12.04.1)
OpenJDK Server VM (build 23.40-b40, mixed mode, sharing)


Create new ASM Disks for an Oracle RAC in VirtualBox

In this post we try to explain the minimum steps necessary to add a new disk to an Oracle ASM instance virtualitzed using VirtualBox. We use command line to execute all the tasks (most of them can also be executed using the different GUI’s).

The first step consist on “create” the virtual disk, this step also “registers” this disk on Virtualbox  Media Manager. In this case the disk have 10Gb of size (10.240 Mb) and is located on the directory where the command is executed, the name of the file is “asm5.vdi”.


vboxmanage createhd --filename asm5.vdi --size 10240 --format VDI --variant Fixed

Next we need to “attach” this disk to all the servers in our RAC configuration (in this case a two rac node), the command to do this is:

vboxmanage storageattach ol7-121-rac1 --storagectl "SATA" --port 5 --device 0 --type hdd --medium asm5.vdi --mtype shareable
vboxmanage storageattach ol7-121-rac2 --storagectl "SATA" --port 5 --device 0 --type hdd --medium asm5.vdi --mtype shareable

The name of the two virtual machines are ol7-121-rac1 and ol7-121-rac2, the device parameter indicates the “controller” type (in our case a virtual SATA controller device with id “0” ) and we must indicate a unused “port” on this controller.

Finally we must define the disk as “shared” to allow both servers to use it at same time

vboxmanage  modifyhd asm5.vdi --type shareable

The tasks on VirtualBox side are done, next go to virtual machines to prepare the new volume.

Now on system log of both servers must appear a message like this (is not necessary to reboot) showing that the new device is detected:

[ 1451.887229] scsi 7:0:0:0: Direct-Access     ATA      VBOX HARDDISK    1.0  PQ: 0 ANSI: 5
[ 1451.888322] sd 7:0:0:0: [sdg] 20971520 512-byte logical blocks: (10.7 GB/10.0 GiB)
[ 1451.888338] sd 7:0:0:0: [sdg] Write Protect is off
[ 1451.888340] sd 7:0:0:0: [sdg] Mode Sense: 00 3a 00 00
[ 1451.888347] sd 7:0:0:0: [sdg] Write cache: enabled, read cache: enabled, doesn't support DPO or FUA
[ 1451.889102] sd 7:0:0:0: Attached scsi generic sg7 type 0
[ 1451.889468]  sdg: unknown partition table
[ 1451.889556] sd 7:0:0:0: [sdg] Attached SCSI disk
[ 1452.328731] SELinux: initialized (dev tmpfs, type tmpfs), uses transition SIDs

We must capture the “scsi id” of the new created device with this command on any of the servers

[root@ol7-121-rac1 ~]# /usr/lib/udev/scsi_id -g -u -d /dev/sdg
1ATA_VBOX_HARDDISK_VB7d862d36-95a92590

The next step to execute on (only one) of the servers is create a partition on the new volume (sdg in this case).

[root@ol7-121-rac1 ~]# fdisk /dev/sdg
Welcome to fdisk (util-linux 2.23.2).

Changes will remain in memory only, until you decide to write them.
Be careful before using the write command.

Device does not contain a recognized partition table
Building a new DOS disklabel with disk identifier 0x62330d87.

Command (m for help): n
Partition type:
p   primary (0 primary, 0 extended, 4 free)
e   extended
Select (default p): p
Partition number (1-4, default 1):
First sector (2048-20971519, default 2048):
Using default value 2048
Last sector, +sectors or +size{K,M,G} (2048-20971519, default 20971519):
Using default value 20971519
Partition 1 of type Linux and of size 10 GiB is set

Command (m for help): w
The partition table has been altered!

Calling ioctl() to re-read partition table.
Syncing disks.

After that the second server not have knowledge of the device new partition, to show the new partition to the other server we must execute on it this command:

[root@ol7-121-rac2 ~]# partx /dev/sdg
NR START      END  SECTORS SIZE NAME UUID
1  2048 20971519 20969472  10G
[root@ol7-121-rac2 ~]# partx -a /dev/sdg

Now all servers have a new partitioned block device. The name of the devices may change between reboots (and may not be the same on all servers) and the default permissions may not allow ASM instances to use the device, the next step is assure a consistent device naming and permissions at every boot and between all servers.

This can be accomplished in various ways, one using the ASMLib from Oracle or using the “udev” (Dynamic device management) from the OS. In this case we use this second approach.

We have created a udev script called 99-oracle-asmdevices.rules

[root@ol7-121-rac1 ~]# cat /etc/udev/rules.d/99-oracle-asmdevices.rules
KERNEL=="sd?1", SUBSYSTEM=="block", PROGRAM=="/usr/lib/udev/scsi_id -g -u -d /dev/$parent", RESULT=="1ATA_VBOX_HARDDISK_VB00ecec07-395a2a52", SYMLINK+="oracleasm/asm-disk1", OWNER="oracle", GROUP="dba", MODE="0660"
KERNEL=="sd?1", SUBSYSTEM=="block", PROGRAM=="/usr/lib/udev/scsi_id -g -u -d /dev/$parent", RESULT=="1ATA_VBOX_HARDDISK_VB1453d286-361fb64b", SYMLINK+="oracleasm/asm-disk2", OWNER="oracle", GROUP="dba", MODE="0660"
KERNEL=="sd?1", SUBSYSTEM=="block", PROGRAM=="/usr/lib/udev/scsi_id -g -u -d /dev/$parent", RESULT=="1ATA_VBOX_HARDDISK_VB2ed01775-17d58006", SYMLINK+="oracleasm/asm-disk3", OWNER="oracle", GROUP="dba", MODE="0660"
KERNEL=="sd?1", SUBSYSTEM=="block", PROGRAM=="/usr/lib/udev/scsi_id -g -u -d /dev/$parent", RESULT=="1ATA_VBOX_HARDDISK_VB0badefb4-2d8464ae", SYMLINK+="oracleasm/asm-disk4", OWNER="oracle", GROUP="dba", MODE="0660"
KERNEL=="sd?1", SUBSYSTEM=="block", PROGRAM=="/usr/lib/udev/scsi_id -g -u -d /dev/$parent", RESULT=="1ATA_VBOX_HARDDISK_VB7d862d36-95a92590", SYMLINK+="oracleasm/asm-disk5", OWNER="oracle", GROUP="dba", MODE="0660"

When udev executes during boot reconfigures devices following the rules on this file.

Every time the kernel detects a device who matches the one defined “sd?1” launches an event and follows the rules in the file, first executes a command (scsi_id) to retrieve the “id” of the device (this id never changes on the life of the device), compares the id with some predefined “id’s” and if match creates a virtual link to the device with a fixed name and change the permissions on the device (is time to use the “scsi id” retrieved some steps ago).

Finally we must “reload” udev rules, ( is possible to execute a “test” first with the command udevadm test /block/sdg1).

[root@ol7-121-rac1 ~]# udevadm control --reload-rules
[root@ol7-121-rac1 ~]# udevadm trigger
[root@ol7-121-rac1 ~]# ls -ltr /dev/oracleasm/
total 0
lrwxrwxrwx. 1 root root 7 Jun  9 17:26 asm-disk3 -> ../sdd1
lrwxrwxrwx. 1 root root 7 Jun  9 17:26 asm-disk5 -> ../sdg1
lrwxrwxrwx. 1 root root 7 Jun  9 17:26 asm-disk2 -> ../sdc1
lrwxrwxrwx. 1 root root 7 Jun  9 17:26 asm-disk1 -> ../sdb1
lrwxrwxrwx. 1 root root 7 Jun  9 17:26 asm-disk4 -> ../sde1

Note: The permissions are changed on the device itself not on the link.

Note2: This rules only works on “partitioned” devices, due the kernel “pattern” to trigger it is “sd?1”, a device without any partition not fits on this pattern.

Finally we must connect to the ASM instance and add the new disk to some diskgroup:

ALTER DISKGROUP data ADD DISK '/dev/oracleasm/asm-disk5';

Note: This command only takes some seconds, but in background the ASM instance launches a “rebalance” operation to move part of the existent data to the new disk.

You now can use all the “new” space in your databases or cloud file systems.

Rafael.


Changes on Support and End of Life dates for Oracle Database 11gR2

Updated 08-2017

In brief, if you use a Oracle Database 11gR2 with latest patchset (11.2.0.4) you have support and bug fixing with no additional cost until December 31 of 2018.

With some more details, Oracle have changed the End of Life (end of bug patching) and Extended Support (bug patching for customers ho pays an extra cost on support fees) for Oracle 11gR2 patch 11.2.0.4. Before the change Extended Support begins on May 31 of 2017, now begins on December 31 of 2018, the end of life is maintained on December 31 of 2020.  The My Oracle Support note about Database Patches and Lifecycle states this change.

Is important to note this only applies to latest patch 11.2.0.4, older patchs of 11gR2 (11.2.0.3, 11.2.0.2, 11.2.0.1) are now out of active support (or in “Sustained Support” according to Oracle nomenclature).

On 11.2.0.4 requesting extended support (and paying an extra on support fees) you can extend the support two more years until 31 December of 2020.

The more recent Oracle Database 12cR1 have the release 12.1.0.1 out of support now, and the 12.1.0.2 with support without extra fees until July 31 of 2019 and with extra fees until 31 July of 2021.

This implies the 11gR2 (11.2.0.4) have six months less support than 12gR1 (12.1.0.2), maybe a good reason to wait until first patch of 12cR2 to upgrade if still on 11gR2? In any case is a good time to begin the migration plans if not done yet.

Note about support types:

In brief:

    • Normal Support: Included in you license maintenance fee. You can request patchsets, new releases, patches for know bugs and the creation of new bug fixes.
    • Extended Support: You must request this type of support in a explicit manner and implies an increment on license maintenance fees. Gives you some extra years of something like “normal support”. The patches created during extended support period only are available to customers with extended support activated.

Maintenance Support:

    • The support team give to you assistance and guidance, you can request existent patchsets and new releases, but you cannot request to create any new patches.


Or in detail on oracle Website.